Spring Boot for Beginners: Build Your First API in 15 Minutes
backend
14 min read
Spring Boot for Beginners: Build Your First API in 15 Minutes
New to Spring Boot? Go from zero to a running REST API in 15 minutes. This beginner's guide covers project setup, key concepts, and your first working endpoint - no prior Spring experience needed.

Published By: Nelson Djalo | Date: March 4, 2025 | Updated: April 5, 2026
Introduction
Setting up a traditional Java project used to mean wrestling with XML config files for hours before writing a single line of business logic. Spring Boot killed that problem. It gives you a working app with one annotation, an embedded server, and sensible defaults you can override when you need to.
This guide takes you from zero to a running REST API. By the end, you'll have a Spring Boot app you built yourself and a solid grasp of how the framework actually works under the hood.
Table of Contents
- What is Spring Boot?
- How to Create Your First Spring Boot Application
- Key Features of Spring Boot
- Configuration and Properties
- Common Patterns and Best Practices
- Troubleshooting Common Issues
- Frequently Asked Questions
- Conclusion
- Next Steps
What is Spring Boot?
Spring Boot is an opinionated framework that simplifies the development of Spring-based applications by providing a set of conventions and auto-configuration capabilities. It builds on top of the Spring Framework to provide a more streamlined development experience while maintaining all the power and flexibility that Spring offers.
Spring Boot vs. Spring Framework: What's the Difference?
Think of the Spring Framework as a comprehensive toolbox - powerful but requiring manual configuration and setup. Spring Boot is that same toolbox, but with an intelligent assistant that automatically selects and configures the right tools for your specific needs.
The key differences between Spring Framework and Spring Boot are:
| Feature | Spring Framework | Spring Boot |
|---|---|---|
| Configuration | Manual (XML/Java) | Auto-configured |
| Setup Time | Longer | Minutes |
| Embedded Server | No (requires Tomcat) | Yes (Tomcat/Jetty included) |
| Boilerplate Code | Heavy | Minimal |
| Dependency Management | Manual | Starter-based |
| Production Readiness | Requires setup | Built-in |
Key Takeaway: Spring Boot is not a replacement for Spring - it's a turbocharger that makes Spring development faster, easier, and more productive.
The Philosophy Behind Spring Boot
Spring Boot follows the principle of "convention over configuration," which means it provides sensible defaults that work for most applications while still allowing you to customize when needed. This approach significantly reduces the amount of configuration code you need to write while maintaining flexibility.
The framework also embraces the "just run" philosophy, meaning you can create a Spring Boot application and run it immediately without any additional setup or configuration. This makes it perfect for rapid prototyping and development.
How to Create Your First Spring Boot Application
Creating your first Spring Boot application is surprisingly straightforward, thanks to the excellent tooling and documentation provided by the Spring team. Let's walk through the process step by step.
Step 1: Use Spring Initializr
Spring Initializr is a web-based tool that generates Spring Boot projects with the dependencies you need. It's the recommended way to start new Spring Boot projects.
-
Navigate to Spring Initializr: Go to start.spring.io in your web browser.
-
Configure Your Project:
- Project: Choose between Maven (XML-based) or Gradle (Groovy/Kotlin-based). Maven is more traditional and widely used, while Gradle offers more flexibility and faster builds.
- Language: Select Java (you can also choose Kotlin or Groovy, but Java is the most common choice).
- Spring Boot Version: Choose the latest stable version (currently 3.x).
- Project Metadata: Fill in your group ID (e.g.,
com.example), artifact ID (e.g.,demo), and other project details.
-
Add Dependencies: This is where Spring Initializr shines. You can add dependencies based on what you want to build:
- Spring Web: For building REST APIs and web applications
- Spring Data JPA: For database access with JPA/Hibernate
- Spring Security: For authentication and authorization
- Spring Boot DevTools: For development convenience (auto-restart, etc.)
- Spring Boot Actuator: For monitoring and management endpoints
-
Generate the Project: Click the "Generate" button to download a ZIP file containing your project.
Step 2: Open the Project in Your IDE
Once you've downloaded and extracted the project, open it in your preferred IDE:
- IntelliJ IDEA: Offers excellent Spring Boot support with features like auto-completion, debugging, and integrated tools
- Eclipse: Provides good Spring Boot support through the Spring Tools Suite
- VS Code: Lightweight option with good Java and Spring Boot extensions
Most modern IDEs will automatically recognize the Spring Boot project structure and provide appropriate tooling and support.
Step 3: Write a "Hello World" Endpoint
Now let's create a simple REST endpoint to verify everything is working correctly. Here's a complete example:
package com.example.demo;

import org.springframework.boot.SpringApplication;
import org.springframework.boot.autoconfigure.SpringBootApplication;
import org.springframework.web.bind.annotation.GetMapping;
import org.springframework.web.bind.annotation.RestController;

@RestController
@SpringBootApplication
public class MyApp {
  public static void main(String[] args) {
    SpringApplication.run(MyApp.class, args);
  }

  @GetMapping("/hello")
  public String sayHello() {
    return "Spring Boot is easy!";
  }
}
Let's break down what each annotation does:
-
@SpringBootApplication: This is a convenience annotation that adds all of the following:@Configuration: Tags the class as a source of bean definitions@EnableAutoConfiguration: Tells Spring Boot to start adding beans based on classpath settings@ComponentScan: Tells Spring to look for other components, configurations, and services in thecom.example.demopackage
-
@RestController: This annotation combines@Controllerand@ResponseBody, indicating that this class is a controller and that the return values from its methods should be written directly to the HTTP response body. -
@GetMapping("/hello"): This annotation maps HTTP GET requests to the/hellopath to thesayHello()method.
Step 4: Run the Application
You can run your Spring Boot application in several ways:
-
From your IDE: Simply click the run button next to the main method
-
From the command line: Navigate to your project directory and run:
mvn spring-boot:runOr if you're using Gradle:
./gradlew bootRun -
Build and run the JAR: You can also build a standalone JAR file:
mvn clean package
java -jar target/demo-0.0.1-SNAPSHOT.jar
Once the application starts, you should see output indicating that the embedded Tomcat server has started on port 8080. You can then visit http://localhost:8080/hello in your browser to see your "Hello World" message.
Key Features of Spring Boot
Spring Boot provides many features that make Java development faster and more efficient. Let's explore the most important ones in detail.
1. Auto-Configuration
Auto-configuration is one of Spring Boot's most powerful features. It automatically configures your application based on the dependencies you have on your classpath and the properties you've defined.
For example, if you have the spring-boot-starter-data-jpa dependency on your classpath, Spring Boot will automatically:
- Configure a
DataSourcebean - Set up an
EntityManagerFactory - Configure transaction management
- Set up Hibernate as the JPA provider
This eliminates the need for extensive XML configuration or Java configuration classes that you would need with traditional Spring Framework applications.
Auto-configuration works through conditional annotations that check for the presence of certain classes or properties. If the conditions are met, the configuration is applied automatically. You can always override these auto-configurations with your own configuration if needed.
2. Embedded Servers
Spring Boot applications can run as standalone JAR files with embedded servers. This means you don't need to deploy WAR files to external application servers like Tomcat, JBoss, or WebSphere.
The embedded server is included in your application JAR, making deployment much simpler. You can run your application with a simple java -jar command, and it will start its own web server.
Spring Boot supports several embedded servers:
- Tomcat (default): The most popular choice for web applications
- Jetty: Lightweight and fast, good for microservices
- Undertow: High-performance server with low memory footprint
You can easily switch between servers by excluding the default Tomcat dependency and adding your preferred server.
3. Spring Boot Starters
Starters are a set of convenient dependency descriptors that you can include in your application. They provide a one-stop-shop for all the Spring and related technology that you need, without having to hunt through sample code and copy-paste loads of dependency descriptors.
Here are some of the most commonly used starters:
spring-boot-starter-web: For building web applications, including RESTful services, using Spring MVC. Uses Tomcat as the default embedded container.spring-boot-starter-data-jpa: For using Spring Data JPA with Hibernate.spring-boot-starter-security: For using Spring Security for authentication and authorization.spring-boot-starter-actuator: For using Spring Boot Actuator, which provides production-ready features to help you monitor and manage your application.spring-boot-starter-ai: For integrating AI capabilities into your Spring Boot applications.spring-boot-starter-webflux: For building reactive web applications using Spring WebFlux.spring-boot-starter-data-redis: For using Redis as a data store.spring-boot-starter-data-mongodb: For using MongoDB as a document database.spring-boot-starter-data-cassandra: For using Apache Cassandra as a NoSQL database.spring-boot-starter-data-couchbase: For using Couchbase as a document database.spring-boot-starter-data-solr: For using Apache Solr for search functionality.
Each starter includes a curated set of dependencies that work well together, along with sensible default configurations.
4. Actuator for Monitoring
Spring Boot Actuator provides production-ready features to help you monitor and manage your application. It includes several built-in endpoints that let you monitor, measure, audit, and even interact with your application.
To enable Actuator, add the starter dependency to your project:
<dependency>
    <groupId>org.springframework.boot</groupId>
    <artifactId>spring-boot-starter-actuator</artifactId>
</dependency>
Then configure which endpoints to expose in your application.properties:
# application.properties
management.endpoints.web.exposure.include=*
management.endpoint.health.show-details=always
This will expose all Actuator endpoints, including:
/actuator/health: Shows application health information/actuator/info: Displays application information/actuator/metrics: Shows various metrics about your application/actuator/env: Shows environment variables and configuration properties
Visit http://localhost:8080/actuator/health to see your application's health status. This is particularly useful for monitoring tools and load balancers.
Configuration and Properties
Spring Boot uses a hierarchical configuration system that allows you to configure your application at different levels. The most common way to configure Spring Boot applications is through properties files.
Application Properties
The application.properties (or application.yml) file is the primary configuration file for Spring Boot applications. You can configure various aspects of your application, such as:
# Server configuration
server.port=8080
server.servlet.context-path=/api

# Database configuration
spring.datasource.url=jdbc:mysql://localhost:3306/mydb
spring.datasource.username=root
spring.datasource.password=password
spring.jpa.hibernate.ddl-auto=update

# Logging configuration
logging.level.com.example.demo=DEBUG
logging.pattern.console=%d{yyyy-MM-dd HH:mm:ss} - %msg%n

# Actuator configuration
management.endpoints.web.exposure.include=health,info,metrics
Profile-Specific Configuration
Spring Boot supports profile-specific configuration files. You can create files like application-dev.properties, application-prod.properties, and application-test.properties for different environments.
To activate a specific profile, you can:
- Set the
spring.profiles.activeproperty - Use the
--spring.profiles.activecommand-line argument - Set the
SPRING_PROFILES_ACTIVEenvironment variable
External Configuration
Spring Boot allows you to externalize configuration in several ways:
- Command-line arguments
- Environment variables
- JNDI attributes
- Java system properties
- Configuration files outside the JAR
This makes it easy to configure your application for different environments without rebuilding the application.
Common Patterns and Best Practices
As you develop Spring Boot applications, you'll encounter several common patterns and best practices that will help you write better, more maintainable code.
Layered Architecture
Spring Boot applications typically follow a layered architecture pattern:
- Controller Layer: Handles HTTP requests and responses
- Service Layer: Contains business logic
- Repository Layer: Handles data access
- Entity Layer: Represents data models
Here's an example of this pattern:
@RestController
@RequestMapping("/api/users")
public class UserController {

    private final UserService userService;

    public UserController(UserService userService) {
        this.userService = userService;
    }

    @GetMapping("/{id}")
    public ResponseEntity<User> getUser(@PathVariable Long id) {
        User user = userService.findById(id);
        return ResponseEntity.ok(user);
    }
}

@Service
public class UserService {

    private final UserRepository userRepository;

    public UserService(UserRepository userRepository) {
        this.userRepository = userRepository;
    }

    public User findById(Long id) {
        return userRepository.findById(id)
            .orElseThrow(() -> new UserNotFoundException("User not found"));
    }
}

@Repository
public interface UserRepository extends JpaRepository<User, Long> {
    // Spring Data JPA provides basic CRUD operations automatically
}
Exception Handling
Spring Boot provides several ways to handle exceptions globally:
@ControllerAdvice
public class GlobalExceptionHandler {

    @ExceptionHandler(UserNotFoundException.class)
    public ResponseEntity<ErrorResponse> handleUserNotFound(UserNotFoundException ex) {
        ErrorResponse error = new ErrorResponse("USER_NOT_FOUND", ex.getMessage());
        return ResponseEntity.status(HttpStatus.NOT_FOUND).body(error);
    }

    @ExceptionHandler(Exception.class)
    public ResponseEntity<ErrorResponse> handleGenericException(Exception ex) {
        ErrorResponse error = new ErrorResponse("INTERNAL_ERROR", "An unexpected error occurred");
        return ResponseEntity.status(HttpStatus.INTERNAL_SERVER_ERROR).body(error);
    }
}
Validation
Spring Boot provides excellent support for input validation using Bean Validation annotations:
@RestController
public class UserController {

    @PostMapping("/users")
    public ResponseEntity<User> createUser(@Valid @RequestBody UserCreateRequest request) {
        // The @Valid annotation will trigger validation
        User user = userService.createUser(request);
        return ResponseEntity.status(HttpStatus.CREATED).body(user);
    }
}

public class UserCreateRequest {
    @NotBlank(message = "Name is required")
    private String name;

    @Email(message = "Email must be valid")
    @NotBlank(message = "Email is required")
    private String email;

    @Min(value = 18, message = "Age must be at least 18")
    private int age;

    // getters and setters
}
Troubleshooting Common Issues
As you develop Spring Boot applications, you'll encounter some common issues. Here are solutions to the most frequent problems:
Port Already in Use
If you get an error that port 8080 is already in use, you can change the port in your application.properties:
server.port=8081Bean Creation Issues
If you encounter bean creation issues, check that:
- All required dependencies are on the classpath
- Configuration classes are properly annotated
- Component scanning is working correctly
You can enable debug logging to see what auto-configuration is being applied:
logging.level.org.springframework.boot.autoconfigure=DEBUGDatabase Connection Issues
For database connection issues:
- Verify that your database is running
- Check connection properties (URL, username, password)
- Ensure the database driver is on the classpath
- Check that the database exists and is accessible
Frequently Asked Questions
Q: How does Spring Boot handle dependency management?
A: Spring Boot uses starter POMs (like a Netflix bundle for code). When you add a starter dependency, Spring Boot automatically pulls in all the related dependencies that work well together. This eliminates version conflicts and ensures compatibility between different components.
For example, when you add spring-boot-starter-web, you automatically get Spring MVC, Tomcat, Jackson for JSON processing, and other web-related dependencies, all with compatible versions.
Q: What's the @SpringBootApplication annotation?
A: The @SpringBootApplication annotation is a convenience annotation that adds all of the following:
@Configuration: Tags the class as a source of bean definitions for the application context@EnableAutoConfiguration: Tells Spring Boot to start adding beans based on classpath settings, other beans, and various property settings@ComponentScan: Tells Spring to look for other components, configurations, and services in thecom.example.demopackage, allowing it to find and register your controllers, services, and other components
This single annotation replaces what would traditionally require multiple annotations and extensive configuration.
Q: Can I use Spring Boot for microservices?
A: Absolutely! Spring Boot is excellent for building microservices. In fact, it's one of the most popular frameworks for microservices development. You can pair it with Spring Cloud to add microservices-specific features like:
- Service discovery (Eureka, Consul)
- API gateways (Spring Cloud Gateway)
- Distributed configuration (Spring Cloud Config)
- Circuit breakers (Resilience4j)
- Distributed tracing (Sleuth)
Spring Boot's embedded server, minimal configuration, and production-ready features make it perfect for microservices architectures.
Q: How do I customize auto-configuration?
A: You can customize auto-configuration in several ways:
- Properties: Most auto-configuration can be customized through properties in
application.properties - Custom configuration classes: Create your own
@Configurationclasses to override auto-configuration - Excluding auto-configuration: Use
@EnableAutoConfiguration(exclude = {...})to exclude specific auto-configuration classes - Conditional configuration: Use
@ConditionalOnPropertyor other conditional annotations to create custom configurations
Q: What's the difference between application.properties and application.yml?
A: Both files serve the same purpose but use different syntax:
application.properties: Uses a simple key-value formatapplication.yml: Uses YAML syntax, which is more readable and supports hierarchical structure
YAML is often preferred for complex configurations because it's more readable and supports comments, but both formats are equally supported by Spring Boot.
Conclusion
You now have a running Spring Boot app, an understanding of auto-configuration, and the patterns you'll use in every project going forward. The best way to learn more is to build something real with it.
Next Steps
Now that you have a solid foundation in Spring Boot, here are some recommended next steps:
- Build a Complete CRUD Application: Create a full-stack application with database integration
- Add Security: Implement authentication and authorization using Spring Security
- Explore Spring Cloud: Learn how to build microservices with Spring Cloud
- Deploy to the Cloud: Learn how to deploy your Spring Boot applications to cloud platforms
Explore our comprehensive Spring Boot course to dive deeper into Spring Boot and build a complete CRUD API with Spring Data JPA and Spring AI. This course will take you from beginner to advanced Spring Boot developer with hands-on projects and real-world examples.

Related Articles
9 Books That Made Me a Better Software Engineer (Not the Usual List)
Skip the generic recommendations. These 9 books changed how I write code, lead teams, and think about systems - from Clean Code to books most devs haven't heard of.
How to Become a Java Full Stack Developer in 2025 (Step-by-Step)
The exact skills, tools, and learning order to go from zero to hired as a Java full stack developer. Covers Spring Boot, React, databases, Docker, and what employers actually look for.
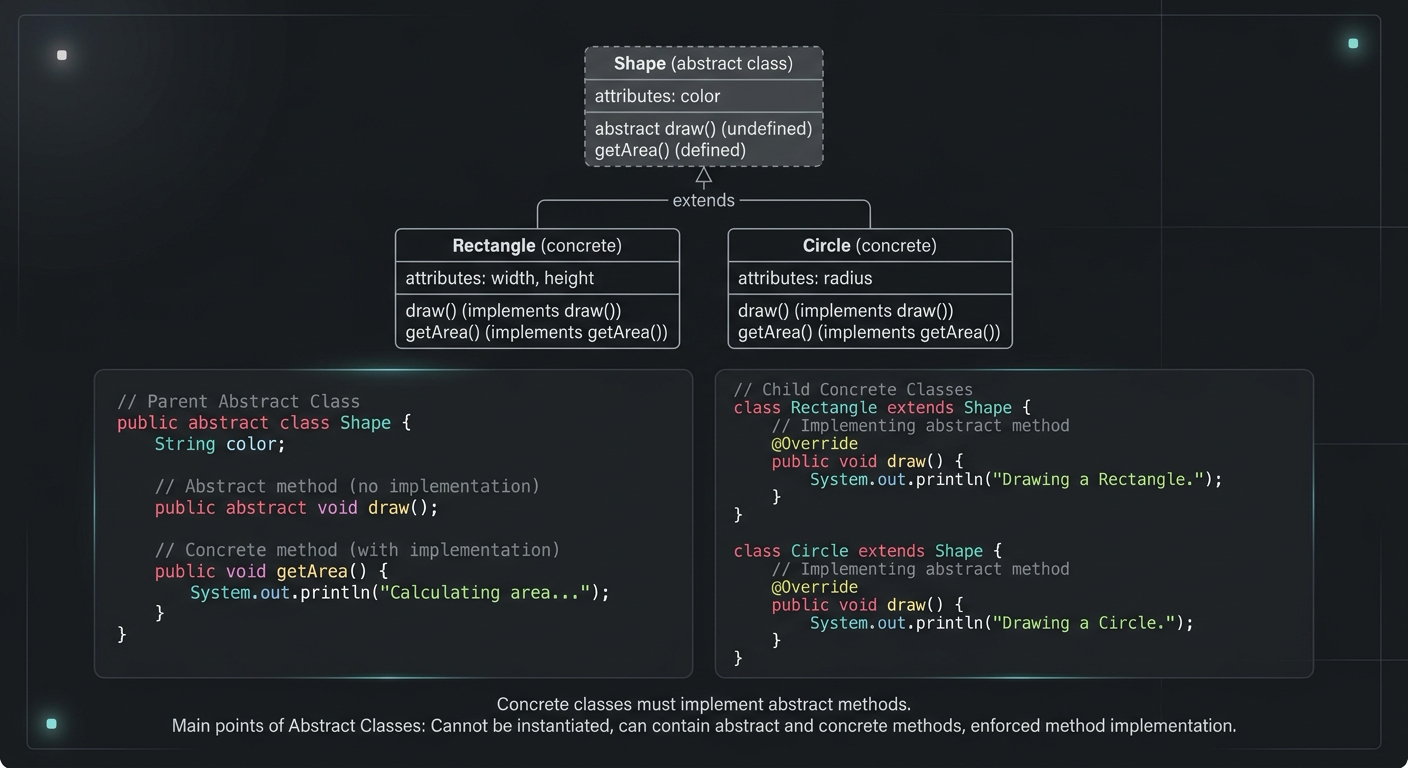
Abstract Class in Java (With Real-World Examples)
Abstract classes in Java are one of the most misunderstood OOP concepts. Here's a practical guide with real-world examples, code you can actually use, and the mistakes most devs make.
Your Career Transformation Starts Now
Join thousands of developers mastering in-demand skills with Amigoscode. Try it free today.