Spring Boot Interview Questions 2025: What Senior Devs Actually Get Asked
backend
14 min read
Spring Boot Interview Questions 2025: What Senior Devs Actually Get Asked
Forget generic Q&As. These are the Spring Boot questions I've seen in real interviews at top companies - with answers that show you understand the 'why', not just the 'what'.

Published By: Nelson Djalo | Date: June 9, 2025 | Updated: April 5, 2026
Introduction
I bombed my first Spring Boot interview because I'd memorized answers without understanding the reasoning behind them. The interviewer asked me about auto-configuration and I just... froze.
These are the questions that actually come up in Spring Boot interviews -- not generic trivia, but the ones where interviewers want to see that you understand the "why." I've organized them from core concepts through advanced topics, with answers that go beyond surface-level definitions.
Core Spring Boot Concepts You'll Be Tested On
1. What Is Spring Boot, and How Does It Simplify Development?
Spring Boot is like a Swiss Army knife for Java developers, designed to eliminate the boilerplate configuration that traditionally made Spring applications complex to set up and deploy. It takes the heavy lifting out of configuring Spring applications by providing several key features that work together to create a streamlined development experience.
Auto-configuration is perhaps the most revolutionary feature. Spring Boot automatically configures your application based on the dependencies on your classpath and the properties you've defined. For example, if you have the spring-boot-starter-data-jpa dependency, Spring Boot will automatically configure a DataSource, EntityManagerFactory, and transaction management without any manual configuration.
Embedded servers eliminate the need to deploy WAR files to external application servers. Your Spring Boot application can run as a standalone JAR file with Tomcat, Jetty, or Undertow embedded. This makes deployment much simpler and more consistent across different environments.
Opinionated defaults provide sensible configurations that work for most applications. These defaults can be easily overridden when you need custom behavior, but they eliminate the need to make countless configuration decisions when starting a new project.
Here's a simple example of a Spring Boot application:
@SpringBootApplication  // Combines @Configuration, @EnableAutoConfiguration, and @ComponentScan
public class MyApp {
    public static void main(String[] args) {
        SpringApplication.run(MyApp.class, args);  // Boots the embedded server
    }
}
The @SpringBootApplication annotation is a convenience annotation that adds all of the following:
@Configuration: Tags the class as a source of bean definitions@EnableAutoConfiguration: Tells Spring Boot to start adding beans based on classpath settings@ComponentScan: Tells Spring to look for other components, configurations, and services
2. Explain the Spring Boot Starter Dependencies
Spring Boot starters are curated dependency bundles that simplify dependency management. Instead of hunting for compatible library versions and managing complex dependency trees, you get a pre-tested set of dependencies that work well together.
Starters follow a naming convention: spring-boot-starter-* where the asterisk indicates the type of application you're building. Each starter includes a curated set of dependencies that are commonly used together for a specific use case.
Here's an example of how to use a starter:
<dependency>
    <groupId>org.springframework.boot</groupId>
    <artifactId>spring-boot-starter-web</artifactId>  <!-- Includes Spring MVC, Tomcat, Jackson -->
</dependency>
The spring-boot-starter-web starter includes:
- Spring MVC for building web applications
- Embedded Tomcat server
- Jackson for JSON processing
- Spring Boot auto-configuration for web applications
Common starters you should know:
spring-boot-starter-web: For building web applications and REST APIsspring-boot-starter-data-jpa: For JPA/Hibernate database accessspring-boot-starter-security: For authentication and authorizationspring-boot-starter-test: For testing with JUnit, Mockito, and other testing toolsspring-boot-starter-actuator: For monitoring and management endpointsspring-boot-starter-data-redis: For Redis cachingspring-boot-starter-validation: For input validation
Pro tip for interviews: Be prepared to explain what dependencies are included in each starter and when you would choose one over another. Interviewers often ask about the differences between similar starters or why you might choose a specific starter for a particular use case.
3. How Does Auto-Configuration Work?
Auto-configuration is one of Spring Boot's most powerful features, and understanding how it works is crucial for interviews. It's implemented through the @EnableAutoConfiguration annotation, which Spring Boot automatically applies when you use @SpringBootApplication.
The auto-configuration mechanism works by:
- Scanning the classpath for specific classes and dependencies
- Checking for existing beans to avoid conflicts
- Applying conditional configuration based on what's found
- Creating beans automatically when conditions are met
For example, if Spring Boot detects the H2 database driver on your classpath, it will automatically configure an in-memory H2 database. If it finds spring-boot-starter-data-jpa, it will configure JPA and Hibernate.
Pro Tip: Use the --debug flag when running your application to see which auto-configurations were applied:
java -jar myapp.jar --debugThis will show you exactly which auto-configuration classes were applied and which were excluded, which is invaluable for debugging configuration issues.
Common auto-configuration scenarios to know:
- Database auto-configuration: Detects database drivers and configures
DataSource - JPA auto-configuration: Sets up
EntityManagerFactoryand transaction management - Web auto-configuration: Configures embedded servlet container and Spring MVC
- Security auto-configuration: Provides basic security configuration
- Actuator auto-configuration: Sets up monitoring endpoints
4. What's the Difference Between @SpringBootApplication and @ComponentScan?
This is a common interview question that tests your understanding of Spring Boot's annotation system.
@SpringBootApplication is a convenience annotation that combines three other annotations:
@Configuration: Marks the class as a source of bean definitions for the application context@EnableAutoConfiguration: Tells Spring Boot to start adding beans based on classpath settings, other beans, and various property settings@ComponentScan: Tells Spring to look for other components, configurations, and services in thecom.example.demopackage, allowing it to find and register your controllers, services, and other components
You can split these annotations for more granular control:
@Configuration
@EnableAutoConfiguration
@ComponentScan(basePackages = "com.example.myapp")
public class MyApp {
    public static void main(String[] args) {
        SpringApplication.run(MyApp.class, args);
    }
}
This approach gives you more control over component scanning, allowing you to specify exactly which packages to scan or exclude certain packages.
Advanced Spring Boot Concepts
5. Explain Spring Boot Profiles and Configuration Management
Spring Boot profiles allow you to configure your application differently for different environments. This is crucial for modern development practices where you need different configurations for development, testing, staging, and production environments.
Profile-specific configuration files:
# application.yml (default)
spring:
  datasource:
    url: jdbc:h2:mem:testdb
    driver-class-name: org.h2.Driver

---
# application-dev.yml
spring:
  datasource:
    url: jdbc:mysql://localhost:3306/devdb
    username: devuser
    password: devpass

---
# application-prod.yml
spring:
  datasource:
    url: jdbc:mysql://prod-server:3306/proddb
    username: ${DB_USERNAME}
    password: ${DB_PASSWORD}
Activating profiles:
You can activate profiles in several ways:
- Command line:
--spring.profiles.active=prod - Environment variable:
SPRING_PROFILES_ACTIVE=prod - In application.yml:
spring.profiles.active: prod
Programmatic profile activation:
@Profile("dev")
@Service
public class DevUserService implements UserService {
    // Development-specific implementation
}

@Profile("prod")
@Service
public class ProdUserService implements UserService {
    // Production-specific implementation
}
6. How Do You Handle Database Migrations in Spring Boot?
Database migrations are essential for managing schema changes in a controlled and repeatable way. Spring Boot supports several migration tools, with Flyway and Liquibase being the most popular.
Using Flyway (recommended for simplicity):
Add the Flyway dependency:
<dependency>
    <groupId>org.flywaydb</groupId>
    <artifactId>flyway-core</artifactId>
</dependency>
Create migration scripts in src/main/resources/db/migration/:
-- V1__Create_users.sql
CREATE TABLE users (
    id SERIAL PRIMARY KEY,
    name VARCHAR(100) NOT NULL,
    email VARCHAR(255) UNIQUE NOT NULL,
    created_at TIMESTAMP DEFAULT CURRENT_TIMESTAMP
);

-- V2__Add_user_roles.sql
ALTER TABLE users ADD COLUMN role VARCHAR(50) DEFAULT 'USER';
Using Liquibase:
<dependency>
    <groupId>org.liquibase</groupId>
    <artifactId>liquibase-core</artifactId>
</dependency>
Create a db/changelog/db.changelog-master.yaml:
databaseChangeLog:
  - changeSet:
      id: 1
      author: developer
      changes:
        - createTable:
            tableName: users
            columns:
              - column:
                  name: id
                  type: bigint
                  autoIncrement: true
                  constraints:
                    primaryKey: true
              - column:
                  name: name
                  type: varchar(100)
                  constraints:
                    nullable: false
7. Explain Spring Boot Actuator and Monitoring
Spring Boot Actuator provides production-ready features to help you monitor and manage your application. It's essential for modern applications that need to be observable and manageable in production environments.
Adding Actuator:
<dependency>
    <groupId>org.springframework.boot</groupId>
    <artifactId>spring-boot-starter-actuator</artifactId>
</dependency>
Configuring endpoints:
management:
  endpoints:
    web:
      exposure:
        include: health,info,metrics,env
      base-path: /actuator
  endpoint:
    health:
      show-details: when-authorized
      show-components: always
    metrics:
      enabled: true
  metrics:
    export:
      prometheus:
        enabled: true
Key Actuator endpoints:
/actuator/health: Application health information/actuator/info: Application information/actuator/metrics: Application metrics/actuator/env: Environment variables and configuration properties/actuator/mappings: HTTP request mappings/actuator/beans: Application beans
Custom health indicators:
@Component
public class DatabaseHealthIndicator implements HealthIndicator {

    private final DataSource dataSource;

    public DatabaseHealthIndicator(DataSource dataSource) {
        this.dataSource = dataSource;
    }

    @Override
    public Health health() {
        try (Connection connection = dataSource.getConnection()) {
            if (connection.isValid(1000)) {
                return Health.up()
                    .withDetail("database", "Available")
                    .build();
            }
        } catch (SQLException e) {
            return Health.down()
                .withDetail("database", "Unavailable")
                .withException(e)
                .build();
        }
        return Health.down().build();
    }
}
Common Pitfalls (And How to Avoid Them)
1. Ignoring Profile-Specific Configurations
This is a common mistake that can lead to hours of debugging. I once wasted an entire day trying to figure out why my production database wasn't connecting, only to realize I had forgotten to activate the prod profile.
The problem: Using the same configuration for all environments can lead to security issues, performance problems, and deployment failures.
The solution: Always use profile-specific configurations and ensure your deployment process activates the correct profile.
# application-prod.yml
spring:
  datasource:
    url: jdbc:postgresql://prod-db:5432/mydb
    username: ${DB_USERNAME}
    password: ${DB_PASSWORD}
  jpa:
    hibernate:
      ddl-auto: validate
    show-sql: false
logging:
  level:
    root: WARN
    com.example: INFO
Activate profiles via:
- Command line:
--spring.profiles.active=prod - Environment variable:
SPRING_PROFILES_ACTIVE=prod - Docker:
ENV SPRING_PROFILES_ACTIVE=prod
2. Overriding Auto-Configuration Incorrectly
Auto-configuration backs off if you define your own beans, but this can sometimes lead to unexpected behavior if you're not careful.
The problem: Defining a bean that conflicts with auto-configuration can disable important features or cause runtime errors.
The solution: Always check the official Spring Boot documentation before overriding auto-configuration, and use conditional annotations when appropriate.
// This will disable Spring Boot's default DataSource auto-configuration
@Bean
public DataSource dataSource() {
    return DataSourceBuilder.create()
        .url("jdbc:h2:mem:testdb")
        .username("sa")
        .password("")
        .build();
}

// Better approach: Use conditional configuration
@ConditionalOnMissingBean(DataSource.class)
@Bean
public DataSource dataSource() {
    // Custom DataSource configuration
}
3. Not Using Constructor Injection
Field injection with @Autowired is convenient but has several drawbacks that make it unsuitable for production code.
The problem: Field injection makes testing difficult, hides dependencies, and can lead to circular dependency issues.
The solution: Always use constructor injection, which makes dependencies explicit and enables immutable objects.
// Avoid this (field injection)
@Service
public class UserService {
    @Autowired
    private UserRepository userRepository;

    @Autowired
    private EmailService emailService;
}

// Use this (constructor injection)
@Service
public class UserService {
    private final UserRepository userRepository;
    private final EmailService emailService;

    public UserService(UserRepository userRepository, EmailService emailService) {
        this.userRepository = userRepository;
        this.emailService = emailService;
    }
}
Best Practices for Spring Boot Applications
1. Use Constructor Injection
Constructor injection is the recommended approach for dependency injection in Spring Boot applications. It provides several benefits:
- Immutability: Dependencies can be marked as
final - Testability: Easy to mock dependencies in unit tests
- Explicit dependencies: All dependencies are clearly visible
- No circular dependencies: Constructor injection prevents circular dependency issues
@RestController
public class UserController {
    private final UserService userService;
    private final UserMapper userMapper;

    public UserController(UserService userService, UserMapper userMapper) {
        this.userService = userService;
        this.userMapper = userMapper;
    }

    @GetMapping("/users/{id}")
    public ResponseEntity<UserDto> getUser(@PathVariable Long id) {
        User user = userService.findById(id);
        return ResponseEntity.ok(userMapper.toDto(user));
    }
}
2. Externalize Configuration
Never hardcode configuration values in your application code. Use external configuration files, environment variables, or configuration servers.
# application.yml
spring:
  datasource:
    url: ${DB_URL:jdbc:h2:mem:testdb}
    username: ${DB_USERNAME:sa}
    password: ${DB_PASSWORD:}
  jpa:
    hibernate:
      ddl-auto: ${DDL_AUTO:create-drop}
    show-sql: ${SHOW_SQL:false}

app:
  feature:
    email-notifications: ${EMAIL_NOTIFICATIONS:true}
  security:
    jwt-secret: ${JWT_SECRET:default-secret-key}
3. Leverage Actuator for Monitoring
Spring Boot Actuator provides essential monitoring and management capabilities that are crucial for production applications.
management:
  endpoints:
    web:
      exposure:
        include: health,info,metrics,env,configprops
      base-path: /actuator
  endpoint:
    health:
      show-details: when-authorized
      show-components: always
    metrics:
      enabled: true
4. Implement Proper Exception Handling
Use @ControllerAdvice to implement global exception handling that provides consistent error responses across your application.
@ControllerAdvice
public class GlobalExceptionHandler {

    @ExceptionHandler(UserNotFoundException.class)
    public ResponseEntity<ErrorResponse> handleUserNotFound(UserNotFoundException ex) {
        ErrorResponse error = new ErrorResponse("USER_NOT_FOUND", ex.getMessage());
        return ResponseEntity.status(HttpStatus.NOT_FOUND).body(error);
    }

    @ExceptionHandler(ValidationException.class)
    public ResponseEntity<ErrorResponse> handleValidation(ValidationException ex) {
        ErrorResponse error = new ErrorResponse("VALIDATION_ERROR", ex.getMessage());
        return ResponseEntity.status(HttpStatus.BAD_REQUEST).body(error);
    }

    @ExceptionHandler(Exception.class)
    public ResponseEntity<ErrorResponse> handleGenericException(Exception ex) {
        ErrorResponse error = new ErrorResponse("INTERNAL_ERROR", "An unexpected error occurred");
        return ResponseEntity.status(HttpStatus.INTERNAL_SERVER_ERROR).body(error);
    }
}
5. Use Validation for Input Data
Always validate input data to ensure data integrity and security.
@RestController
public class UserController {

    @PostMapping("/users")
    public ResponseEntity<UserDto> createUser(@Valid @RequestBody UserCreateRequest request) {
        User user = userService.createUser(request);
        return ResponseEntity.status(HttpStatus.CREATED).body(userMapper.toDto(user));
    }
}

public class UserCreateRequest {
    @NotBlank(message = "Name is required")
    @Size(min = 2, max = 100, message = "Name must be between 2 and 100 characters")
    private String name;

    @Email(message = "Email must be valid")
    @NotBlank(message = "Email is required")
    private String email;

    @Min(value = 18, message = "Age must be at least 18")
    private int age;

    // getters and setters
}
Testing Strategies for Spring Boot Applications
1. Unit Testing
Unit tests focus on testing individual components in isolation. Use JUnit 5 and Mockito for effective unit testing.
@ExtendWith(MockitoExtension.class)
class UserServiceTest {

    @Mock
    private UserRepository userRepository;

    @Mock
    private EmailService emailService;

    @InjectMocks
    private UserService userService;

    @Test
    void createUser_ValidUser_ReturnsCreatedUser() {
        // Given
        UserCreateRequest request = new UserCreateRequest("John Doe", "john@example.com", 25);
        User savedUser = new User(1L, "John Doe", "john@example.com", 25);

        when(userRepository.save(any(User.class))).thenReturn(savedUser);
        when(emailService.sendWelcomeEmail(anyString())).thenReturn(true);

        // When
        User result = userService.createUser(request);

        // Then
        assertThat(result.getName()).isEqualTo("John Doe");
        assertThat(result.getEmail()).isEqualTo("john@example.com");
        verify(userRepository).save(any(User.class));
        verify(emailService).sendWelcomeEmail("john@example.com");
    }

    @Test
    void createUser_DuplicateEmail_ThrowsException() {
        // Given
        UserCreateRequest request = new UserCreateRequest("John Doe", "john@example.com", 25);
        when(userRepository.findByEmail("john@example.com")).thenReturn(Optional.of(new User()));

        // When & Then
        assertThatThrownBy(() -> userService.createUser(request))
            .isInstanceOf(DuplicateEmailException.class)
            .hasMessage("Email already exists");
    }
}
2. Integration Testing
Integration tests verify that components work together correctly. Use @SpringBootTest for full application context testing.
@SpringBootTest(webEnvironment = SpringBootTest.WebEnvironment.RANDOM_PORT)
@AutoConfigureTestDatabase(replace = AutoConfigureTestDatabase.Replace.NONE)
class UserControllerIntegrationTest {

    @Autowired
    private TestRestTemplate restTemplate;

    @Autowired
    private UserRepository userRepository;

    @Test
    void createUser_ValidRequest_ReturnsCreatedUser() {
        // Given
        UserCreateRequest request = new UserCreateRequest("Jane Doe", "jane@example.com", 30);

        // When
        ResponseEntity<UserDto> response = restTemplate.postForEntity(
            "/api/users", request, UserDto.class);

        // Then
        assertThat(response.getStatusCode()).isEqualTo(HttpStatus.CREATED);
        assertThat(response.getBody().getName()).isEqualTo("Jane Doe");
        assertThat(userRepository.findByEmail("jane@example.com")).isPresent();
    }
}
3. Slice Testing
Slice tests focus on testing specific layers of your application. Use @WebMvcTest for controller testing and @DataJpaTest for repository testing.
@WebMvcTest(UserController.class)
class UserControllerTest {

    @Autowired
    private MockMvc mockMvc;

    @MockBean
    private UserService userService;

    @Test
    void getUser_ExistingUser_ReturnsUser() throws Exception {
        // Given
        User user = new User(1L, "John Doe", "john@example.com", 25);
        when(userService.findById(1L)).thenReturn(user);

        // When & Then
        mockMvc.perform(get("/api/users/1"))
            .andExpect(status().isOk())
            .andExpect(jsonPath("$.name").value("John Doe"))
            .andExpect(jsonPath("$.email").value("john@example.com"));
    }
}
Frequently Asked Questions
1. How Do You Handle Database Migrations in Spring Boot?
Database migrations are essential for managing schema changes in a controlled and repeatable way. Spring Boot supports several migration tools, with Flyway and Liquibase being the most popular.
Using Flyway:
<dependency>
    <groupId>org.flywaydb</groupId>
    <artifactId>flyway-core</artifactId>
</dependency>
Create migration scripts in src/main/resources/db/migration/:
-- V1__Create_users.sql
CREATE TABLE users (
    id SERIAL PRIMARY KEY,
    name VARCHAR(100) NOT NULL,
    email VARCHAR(255) UNIQUE NOT NULL,
    created_at TIMESTAMP DEFAULT CURRENT_TIMESTAMP
);

-- V2__Add_user_roles.sql
ALTER TABLE users ADD COLUMN role VARCHAR(50) DEFAULT 'USER';
Using Liquibase:
<dependency>
    <groupId>org.liquibase</groupId>
    <artifactId>liquibase-core</artifactId>
</dependency>
2. Can Spring Boot Work with Non-Relational Databases?
Absolutely! Spring Boot provides excellent support for NoSQL databases through Spring Data projects. Check out Spring Data MongoDB for MongoDB support, or explore other Spring Data modules for Redis, Cassandra, and more.
@Document(collection = "users")
public class User {
    @Id
    private String id;
    private String name;
    private String email;
    private int age;

    // getters and setters
}

@Repository
public interface UserRepository extends MongoRepository<User, String> {
    Optional<User> findByEmail(String email);
    List<User> findByAgeGreaterThan(int age);
}
3. What's the Best Way to Secure a Spring Boot App?
Start with spring-boot-starter-security and customize the configuration based on your requirements:
@Configuration
@EnableWebSecurity
public class SecurityConfig {

    @Bean
    SecurityFilterChain securityFilterChain(HttpSecurity http) throws Exception {
        http
            .authorizeHttpRequests(auth -> auth
                .requestMatchers("/api/public/**").permitAll()
                .requestMatchers("/api/admin/**").hasRole("ADMIN")
                .anyRequest().authenticated()
            )
            .csrf(csrf -> csrf.disable())
            .sessionManagement(session -> session
                .sessionCreationPolicy(SessionCreationPolicy.STATELESS)
            )
            .addFilterBefore(jwtAuthenticationFilter, UsernamePasswordAuthenticationFilter.class);

        return http.build();
    }

    @Bean
    PasswordEncoder passwordEncoder() {
        return new BCryptPasswordEncoder();
    }
}
4. How Do You Test Spring Boot Applications?
Spring Boot provides excellent testing support with several testing annotations and utilities:
Unit Testing:
@ExtendWith(MockitoExtension.class)
class UserServiceTest {
    @Mock
    private UserRepository userRepository;

    @InjectMocks
    private UserService userService;

    @Test
    void findById_ExistingUser_ReturnsUser() {
        // test implementation
    }
}
Integration Testing:
@SpringBootTest(webEnvironment = SpringBootTest.WebEnvironment.RANDOM_PORT)
class UserControllerIntegrationTest {
    @Autowired
    private TestRestTemplate restTemplate;

    @Test
    void createUser_ValidRequest_ReturnsCreatedUser() {
        // test implementation
    }
}
Slice Testing:
@WebMvcTest(UserController.class)
class UserControllerTest {
    @Autowired
    private MockMvc mockMvc;

    @MockBean
    private UserService userService;

    @Test
    void getUser_ExistingUser_ReturnsUser() throws Exception {
        // test implementation
    }
}
5. What Are Alternatives to Spring Boot?
While Spring Boot is excellent, there are several alternatives worth considering:
Micronaut: Faster startup times and lower memory footprint, ideal for serverless applications and microservices.
Quarkus: Kubernetes-native Java framework with GraalVM support for native compilation.
Helidon: Oracle's lightweight framework for microservices.
Vert.x: Event-driven, non-blocking framework for building reactive applications.
Each alternative has its strengths, and the choice depends on your specific requirements, such as startup time, memory usage, or deployment environment.
Conclusion
Don't memorize these answers -- build something with Spring Boot so you can talk about it from experience. Interviewers can tell the difference immediately.
Want to go deeper? Explore real-world API patterns in Building APIs with Spring Boot or level up with the Spring Boot Roadmap.
Related Articles
9 Books That Made Me a Better Software Engineer (Not the Usual List)
Skip the generic recommendations. These 9 books changed how I write code, lead teams, and think about systems - from Clean Code to books most devs haven't heard of.

How to Become a Java Full Stack Developer in 2025 (Step-by-Step)
The exact skills, tools, and learning order to go from zero to hired as a Java full stack developer. Covers Spring Boot, React, databases, Docker, and what employers actually look for.
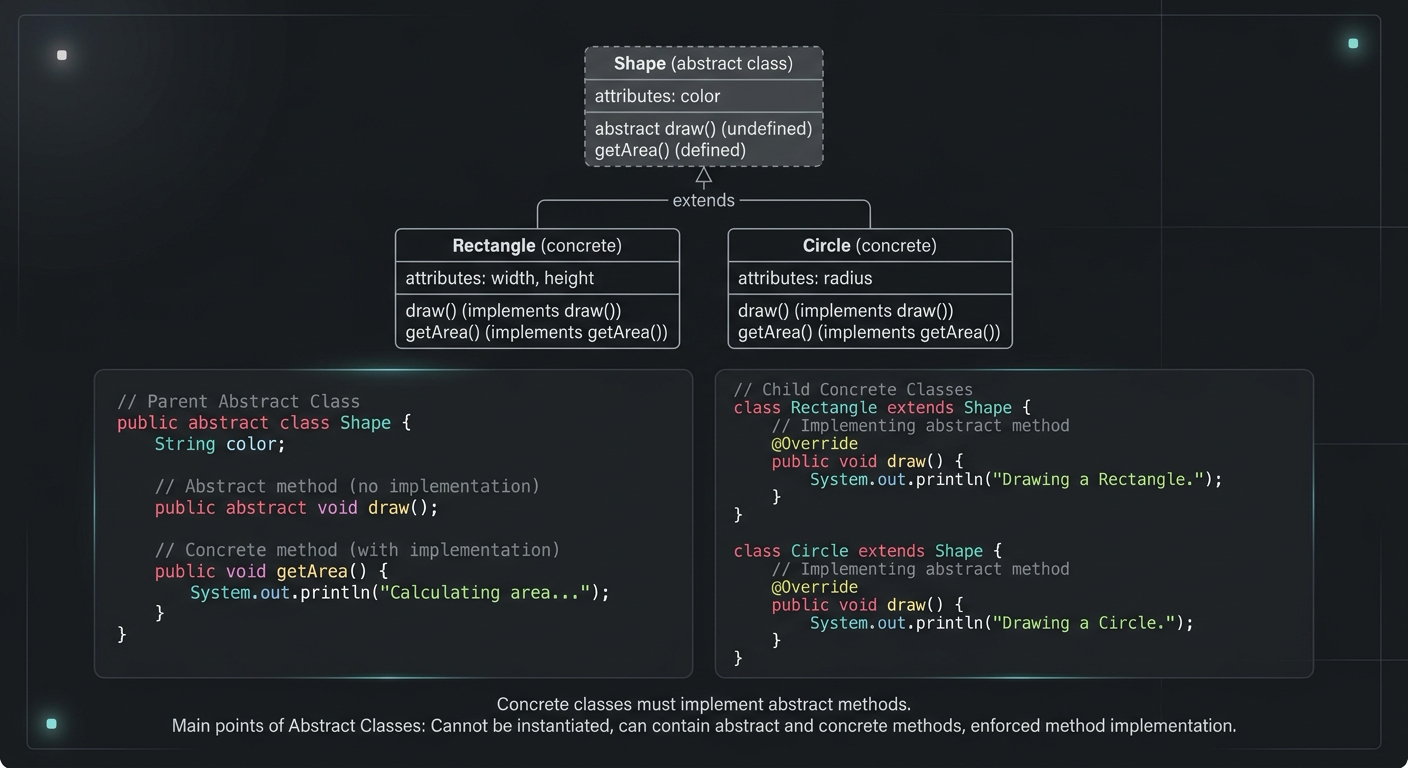
Abstract Class in Java (With Real-World Examples)
Abstract classes in Java are one of the most misunderstood OOP concepts. Here's a practical guide with real-world examples, code you can actually use, and the mistakes most devs make.
Your Career Transformation Starts Now
Join thousands of developers mastering in-demand skills with Amigoscode. Try it free today.