Spring Boot Annotations Cheat Sheet (The Ones That Matter)
backend
9 min read
Spring Boot Annotations Cheat Sheet (The Ones That Matter)
There are hundreds of Spring Boot annotations. You need about 20. Here's a cheat sheet of the annotations you'll actually use in every project - with examples for each.

Published By: Nelson Djalo | Date: April 5, 2026
Table of Contents
- Core Annotations
- Web Annotations
- Data Annotations
- Validation Annotations
- Configuration Annotations
- Testing Annotations
- FAQ
- Wrapping Up
Core Annotations
These are the building blocks. Every Spring Boot project uses them.
@SpringBootApplication
This is the entry point of your application. It combines three annotations into one: @Configuration, @EnableAutoConfiguration, and @ComponentScan.
@SpringBootApplication
public class Application {
    public static void main(String[] args) {
        SpringApplication.run(Application.class, args);
    }
}
You get one of these per project. Don't overthink it.
@Component
Marks a class as a Spring-managed bean. Spring will detect it during component scanning and create an instance for you.
@Component
public class EmailSender {
    public void send(String to, String body) {
        // send email logic
    }
}
@Service
Same as @Component but signals that the class holds business logic. Use it for your service layer.
@Service
public class UserService {
    public User findById(Long id) {
        return userRepository.findById(id)
            .orElseThrow(() -> new UserNotFoundException(id));
    }
}
@Repository
Same as @Component but for your data access layer. Spring also translates database exceptions into Spring's DataAccessException hierarchy, which is a nice bonus.
@Repository
public interface UserRepository extends JpaRepository<User, Long> {
    Optional<User> findByEmail(String email);
}
@Configuration
Tells Spring this class contains bean definitions. Use it when you need to set up third-party libraries or create beans that need custom initialization.
@Configuration
public class SecurityConfig {
    @Bean
    public PasswordEncoder passwordEncoder() {
        return new BCryptPasswordEncoder();
    }
}
@Bean
Defines a method that returns an object Spring should manage. Always lives inside a @Configuration class.
@Bean
public RestTemplate restTemplate() {
    return new RestTemplateBuilder()
        .setConnectTimeout(Duration.ofSeconds(5))
        .build();
}
Quick rule of thumb: use @Component (or @Service, @Repository) for your own classes. Use @Bean for third-party classes you don't control.
Web Annotations
These power your REST APIs. If you're building APIs with Spring Boot, you'll use all of these constantly.
@RestController
Combines @Controller and @ResponseBody. Every method in the class returns data directly (usually JSON) instead of rendering a view.
@RestController
@RequestMapping("/api/v1/users")
public class UserController {
    // all methods return JSON by default
}
@RequestMapping
Sets the base URL path for all endpoints in a controller. You can also use it on individual methods, but the shorthand annotations below are cleaner.
@RequestMapping("/api/v1/products")
public class ProductController { }
@GetMapping, @PostMapping, @PutMapping, @DeleteMapping
Shorthand for @RequestMapping with a specific HTTP method. Use these on your methods.
@GetMapping
public List<User> getAll() {
    return userService.findAll();
}

@PostMapping
public User create(@RequestBody CreateUserRequest request) {
    return userService.create(request);
}

@PutMapping("/{id}")
public User update(@PathVariable Long id, @RequestBody UpdateUserRequest request) {
    return userService.update(id, request);
}

@DeleteMapping("/{id}")
public void delete(@PathVariable Long id) {
    userService.delete(id);
}
@PathVariable
Extracts a value from the URL path.
@GetMapping("/{id}")
public User getById(@PathVariable Long id) {
    return userService.findById(id);
}
@RequestParam
Extracts a query parameter from the URL. Supports default values and optional parameters.
@GetMapping("/search")
public List<User> search(
    @RequestParam String name,
    @RequestParam(defaultValue = "0") int page
) {
    return userService.search(name, page);
}
@RequestBody
Deserializes the request body (usually JSON) into a Java object.
@PostMapping
public User create(@RequestBody CreateUserRequest request) {
    return userService.create(request);
}
Data Annotations
These come from JPA (Jakarta Persistence API) and handle your database mapping. If you want to go deeper, the Spring Data JPA course covers everything.
@Entity
Marks a class as a JPA entity - meaning it maps to a database table.
@Entity
public class User {
    @Id
    @GeneratedValue(strategy = GenerationType.IDENTITY)
    private Long id;
    private String name;
    private String email;
}
@Table
Customizes the table name. Without it, JPA uses the class name.
@Entity
@Table(name = "app_users")
public class User { }
@Id
Marks a field as the primary key.
@GeneratedValue
Tells JPA how to generate the primary key. IDENTITY lets the database handle auto-increment, which is the most common choice for PostgreSQL and MySQL.
@Id
@GeneratedValue(strategy = GenerationType.IDENTITY)
private Long id;
@Column
Customizes column mapping. Useful for renaming columns, setting constraints, or specifying length.
@Column(name = "email_address", nullable = false, unique = true)
private String email;
@Transactional
Wraps a method (or all methods in a class) in a database transaction. If anything throws an exception, the whole thing rolls back.
@Service
public class OrderService {
    @Transactional
    public Order placeOrder(OrderRequest request) {
        Order order = orderRepository.save(new Order(request));
        paymentService.charge(order);
        inventoryService.reserve(order);
        return order;
    }
}
Put @Transactional on your service methods, not your repository or controller. That's where your business logic lives and where you want the transaction boundary.
Validation Annotations
Spring Boot integrates with Jakarta Bean Validation (Hibernate Validator). Add spring-boot-starter-validation to your dependencies and you're set.
@Valid
Triggers validation on a request body or nested object. Without this, your validation annotations do nothing.
@PostMapping
public User create(@Valid @RequestBody CreateUserRequest request) {
    return userService.create(request);
}
@NotNull, @NotBlank, @Size, @Email
The most common field-level validators. Use them on your DTOs.
public class CreateUserRequest {
    @NotBlank(message = "Name is required")
    private String name;

    @NotNull
    @Email(message = "Must be a valid email")
    private String email;

    @Size(min = 8, max = 100, message = "Password must be between 8 and 100 characters")
    private String password;
}
@NotNull rejects null values. @NotBlank rejects null, empty strings, and whitespace-only strings. For String fields, you almost always want @NotBlank.
Configuration Annotations
These control how your application reads and uses configuration properties.
@Value
Injects a single value from application.properties or application.yml.
@Value("${app.jwt.secret}")
private String jwtSecret;

@Value("${app.pagination.default-size:20}")
private int defaultPageSize;
The :20 syntax sets a default value if the property isn't found. Handy for local development.
@ConfigurationProperties
Binds a group of related properties to a POJO. Much cleaner than scattered @Value annotations when you have multiple related settings.
@ConfigurationProperties(prefix = "app.mail")
public class MailProperties {
    private String host;
    private int port;
    private String username;
    private String password;
}app:
mail:
host: smtp.gmail.com
port: 587
username: noreply@example.com
password: secret@Profile
Activates a bean only when a specific profile is active. Great for swapping implementations between environments.
@Service
@Profile("dev")
public class FakeEmailService implements EmailService {
    public void send(String to, String body) {
        log.info("Fake email to {} - {}", to, body);
    }
}
@ConditionalOnProperty
Conditionally creates a bean based on a property value. More flexible than @Profile for feature flags.
@Configuration
@ConditionalOnProperty(name = "app.cache.enabled", havingValue = "true")
public class CacheConfig {
    @Bean
    public CacheManager cacheManager() {
        return new ConcurrentMapCacheManager("users", "products");
    }
}
Testing Annotations
Spring Boot's test framework is excellent once you know which annotation to reach for. These are the main ones.
@SpringBootTest
Loads the full application context. Use it for integration tests where you need everything wired up.
@SpringBootTest
class OrderServiceIntegrationTest {
    @Autowired
    private OrderService orderService;

    @Test
    void shouldPlaceOrder() {
        OrderRequest request = new OrderRequest("item-1", 2);
        Order order = orderService.placeOrder(request);
        assertThat(order.getStatus()).isEqualTo(OrderStatus.PLACED);
    }
}
It's slow because it boots the whole app. Don't use it for unit tests.
@MockBean
Replaces a bean in the application context with a Mockito mock. Perfect for isolating the class under test.
@SpringBootTest
class UserServiceTest {
    @Autowired
    private UserService userService;

    @MockBean
    private UserRepository userRepository;

    @Test
    void shouldFindUser() {
        when(userRepository.findById(1L))
            .thenReturn(Optional.of(new User(1L, "Amigos")));

        User user = userService.findById(1L);
        assertThat(user.getName()).isEqualTo("Amigos");
    }
}
@DataJpaTest
Loads only the JPA layer - entities, repositories, and an embedded database. Fast and focused.
@DataJpaTest
class UserRepositoryTest {
    @Autowired
    private UserRepository userRepository;

    @Test
    void shouldFindByEmail() {
        userRepository.save(new User("test@example.com", "Test User"));
        Optional<User> found = userRepository.findByEmail("test@example.com");
        assertThat(found).isPresent();
    }
}
@WebMvcTest
Loads only the web layer - controllers, filters, and advice. Doesn't start a real server. Use it to test your controllers in isolation.
@WebMvcTest(UserController.class)
class UserControllerTest {
    @Autowired
    private MockMvc mockMvc;

    @MockBean
    private UserService userService;

    @Test
    void shouldReturnUser() throws Exception {
        when(userService.findById(1L))
            .thenReturn(new User(1L, "Amigos"));

        mockMvc.perform(get("/api/v1/users/1"))
            .andExpect(status().isOk())
            .andExpect(jsonPath("$.name").value("Amigos"));
    }
}
Pick the narrowest test slice you can. @WebMvcTest and @DataJpaTest are almost always better than @SpringBootTest for focused tests.
FAQ
What is @SpringBootApplication actually doing?
It's a convenience annotation that combines @Configuration, @EnableAutoConfiguration, and @ComponentScan. It tells Spring to configure itself based on your dependencies, scan your packages for beans, and allow custom bean definitions. You need exactly one per application.
What's the difference between @Component, @Service, and @Repository?
Functionally, they all register a class as a Spring bean. The difference is semantic. @Service signals business logic, @Repository signals data access (and adds exception translation), and @Component is the generic fallback. Use the specific ones so your codebase communicates intent.
When should I use @Bean instead of @Component?
Use @Component for classes you write. Use @Bean for classes from third-party libraries that you can't annotate yourself. For example, you can't put @Component on RestTemplate because you don't own that class - so you create a @Bean method in a @Configuration class instead.
Do I need to add @Transactional to every service method?
No. Add it to methods that perform multiple database operations that should succeed or fail together. A simple read query usually doesn't need it. Overusing @Transactional can actually hurt performance by holding database connections longer than necessary.
Which test annotation should I use?
Start with the narrowest slice. Testing a controller? Use @WebMvcTest. Testing a repository? Use @DataJpaTest. Only use @SpringBootTest when you genuinely need the full application context, like for end-to-end integration tests.
Wrapping Up
That's the full cheat sheet. These annotations cover the vast majority of what you'll need for any Spring Boot project, from simple CRUD APIs to complex microservices.
If you want to see all of these in action with a real project, start with the Building APIs with Spring Boot course, then move on to the Spring Boot Master Class for the full picture. And if you're mapping out your learning path, the Spring Boot Roadmap has you covered.
Related Articles
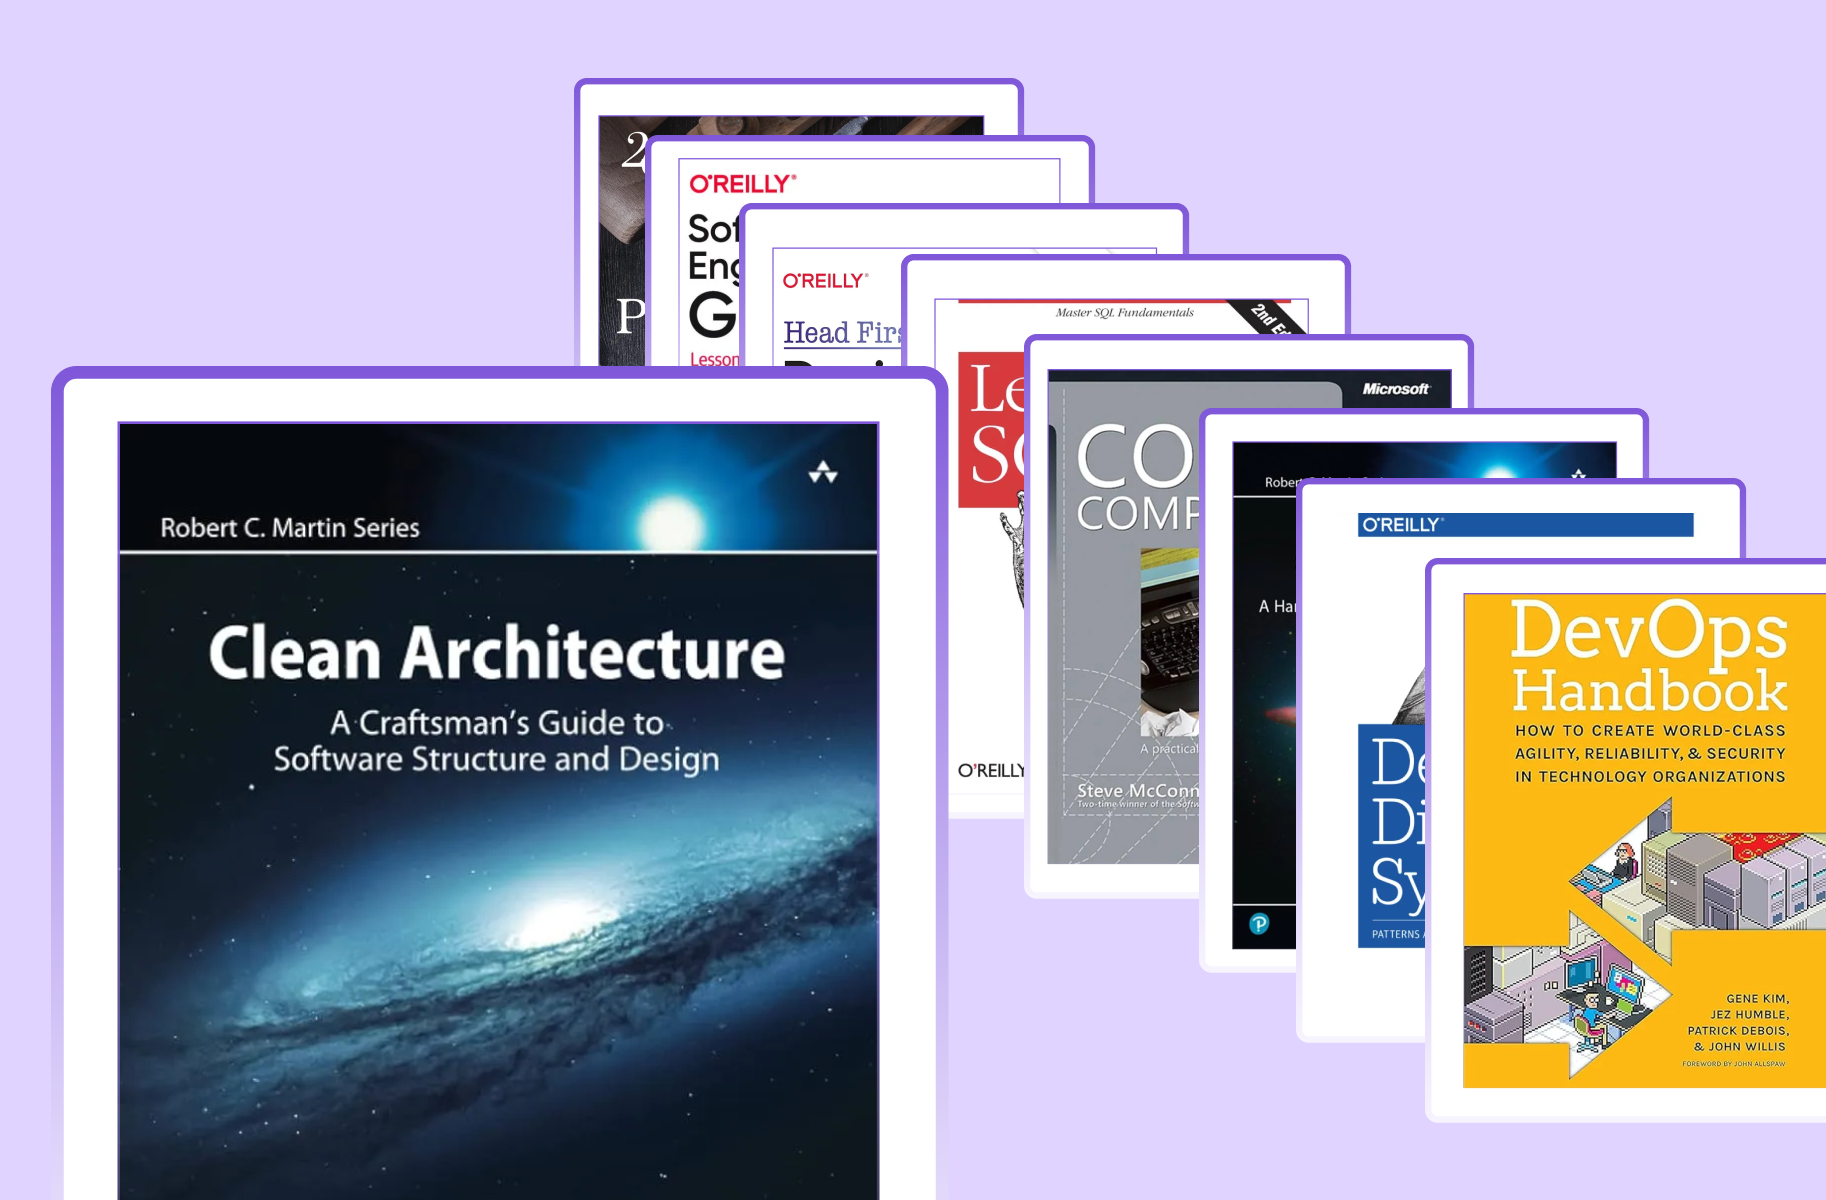
9 Books That Made Me a Better Software Engineer (Not the Usual List)
Skip the generic recommendations. These 9 books changed how I write code, lead teams, and think about systems - from Clean Code to books most devs haven't heard of.

How to Become a Java Full Stack Developer in 2025 (Step-by-Step)
The exact skills, tools, and learning order to go from zero to hired as a Java full stack developer. Covers Spring Boot, React, databases, Docker, and what employers actually look for.
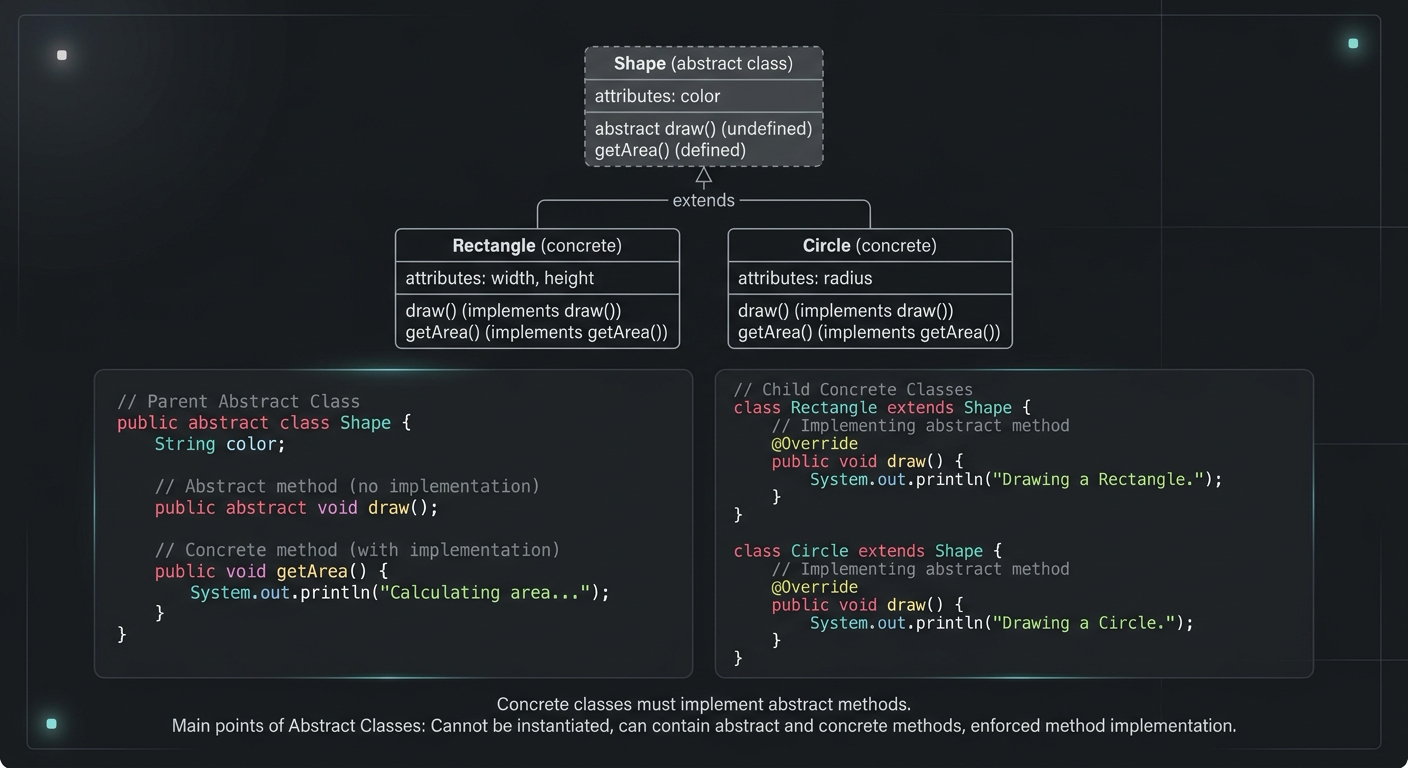
Abstract Class in Java (With Real-World Examples)
Abstract classes in Java are one of the most misunderstood OOP concepts. Here's a practical guide with real-world examples, code you can actually use, and the mistakes most devs make.
Your Career Transformation Starts Now
Join thousands of developers mastering in-demand skills with Amigoscode. Try it free today.