Spring Boot + Redis Caching Tutorial
backend
8 min read
Spring Boot + Redis Caching Tutorial
Slash response times by 10x with Spring Boot and Redis caching. Copy-paste setup, real annotations, and the gotchas nobody warns you about.

Published By: Nelson Djalo | Date: April 7, 2026
Your endpoint is hitting Postgres on every request. The query takes 400ms. Users are bouncing. You add Redis in front of it and suddenly that same endpoint returns in 8ms - and your database load drops by 90%. That is the entire pitch for Redis caching, and Spring Boot makes it almost embarrassingly easy to wire up.
This tutorial walks through the full setup - Docker, dependencies, config, annotations, custom keys, TTLs, and the patterns that keep you out of trouble in production.
Table of Contents
- Why Redis for Caching
- Setup - Docker Compose with Redis
- Spring Boot Dependencies
- application.yml Config
- Enable Caching
- @Cacheable - Read-Through Caching
- @CachePut - Write-Through Updates
- @CacheEvict - Removing Stale Entries
- Custom Cache Key Generation
- TTL and Serialization
- Cache Warming and Best Practices
- FAQ
- Wrapping Up
Why Redis for Caching
Redis is an in-memory key-value store that reads and writes in microseconds. When you put it between your app and your database, repeat queries skip the slow disk hit entirely. You get faster responses, lower database costs, and headroom to handle traffic spikes without scaling your DB tier.
Spring Boot ships with a cache abstraction that lets you swap providers without touching your business logic. You write @Cacheable once, and whether the backend is a ConcurrentHashMap, Caffeine, or Redis, your code does not change. Pair that with Redis and you get a distributed cache that works across multiple app instances - which matters the moment you go beyond a single server.
If you are still mapping out the wider Spring ecosystem, the Spring Boot Roadmap is a good starting point.
Setup - Docker Compose with Redis
Spinning up Redis locally takes about 20 seconds. Drop this into a docker-compose.yml at the root of your project:
services:
  redis:
    image: redis:7.2-alpine
    container_name: redis-cache
    ports:
      - "6379:6379"
    volumes:
      - redis-data:/data
    command: redis-server --appendonly yes
    healthcheck:
      test: ["CMD", "redis-cli", "ping"]
      interval: 10s
      timeout: 5s
      retries: 5

volumes:
  redis-data:
Run docker compose up -d and you have Redis on port 6379 with persistence enabled. The healthcheck makes sure your app does not start hammering a half-booted container. If you want a deeper Docker walkthrough for Java apps, check the Spring Boot + Docker guide.
Spring Boot Dependencies
Two starters do all the heavy lifting. Add them to your pom.xml:
<dependency>
    <groupId>org.springframework.boot</groupId>
    <artifactId>spring-boot-starter-data-redis</artifactId>
</dependency>
<dependency>
    <groupId>org.springframework.boot</groupId>
    <artifactId>spring-boot-starter-cache</artifactId>
</dependency>
spring-boot-starter-data-redis brings in Lettuce (the default Redis client) and RedisTemplate. spring-boot-starter-cache enables the @Cacheable, @CachePut, and @CacheEvict annotations. Together they auto-configure a RedisCacheManager the moment Redis is on your classpath.
application.yml Config
Point Spring at your Redis instance and pick the cache type:
spring:
  data:
    redis:
      host: localhost
      port: 6379
      timeout: 2000ms
      lettuce:
        pool:
          max-active: 8
          max-idle: 8
          min-idle: 2
  cache:
    type: redis
    redis:
      time-to-live: 600000
      cache-null-values: false
      use-key-prefix: true
      key-prefix: "amigos::"
time-to-live is in milliseconds - this is your default TTL of 10 minutes. cache-null-values: false stops Redis from caching null results, which prevents the classic cache poisoning bug where a missing record gets stuck. The key-prefix namespaces your keys so multiple apps can share a Redis instance without colliding.
Enable Caching
You need exactly one annotation to turn the whole thing on:
@SpringBootApplication
@EnableCaching
public class Application {
    public static void main(String[] args) {
        SpringApplication.run(Application.class, args);
    }
}
That is it. Spring scans for cache annotations on your beans and wires up proxies that intercept method calls. No XML, no manual RedisTemplate plumbing.
@Cacheable - Read-Through Caching
@Cacheable is the workhorse. The first call hits your method, the result gets stored in Redis, and every subsequent call with the same arguments returns the cached value:
@Service
public class ProductService {

    private final ProductRepository repository;

    public ProductService(ProductRepository repository) {
        this.repository = repository;
    }

    @Cacheable(value = "products", key = "#id")
    public Product findById(Long id) {
        System.out.println("Hitting database for product " + id);
        return repository.findById(id)
                .orElseThrow(() -> new ProductNotFoundException(id));
    }
}
Call findById(42) twice - the println only fires once. The second call comes straight from Redis. The value = "products" defines the cache name (which becomes part of the Redis key), and key = "#id" uses SpEL to pick the method argument as the key.
@CachePut - Write-Through Updates
@CachePut always runs the method but also updates the cache with the return value. Use it when you change a record and want the cache to reflect the new state immediately:
@CachePut(value = "products", key = "#product.id")
public Product update(Product product) {
    return repository.save(product);
}
Now if someone calls findById right after the update, they get the fresh version - no stale read.
@CacheEvict - Removing Stale Entries
@CacheEvict deletes entries. Use it on deletes, or when an update touches data spread across multiple cache entries:
@CacheEvict(value = "products", key = "#id")
public void delete(Long id) {
    repository.deleteById(id);
}

@CacheEvict(value = "products", allEntries = true)
public void clearAll() {
    // Wipes the entire 'products' cache
}
allEntries = true is the nuclear option. Handy for batch jobs that touch hundreds of records, where evicting individually would be slower than just dumping the whole cache.
Custom Cache Key Generation
Default keys work for single arguments, but real methods often take filters, pageables, or DTOs. SpEL handles most cases:
@Cacheable(value = "products", key = "#category + '::' + #page + '::' + #size")
public Page<Product> findByCategory(String category, int page, int size) {
    return repository.findByCategory(category, PageRequest.of(page, size));
}
For anything more complex, write a KeyGenerator bean:
@Bean
public KeyGenerator customKeyGenerator() {
    return (target, method, params) -> {
        StringBuilder key = new StringBuilder(method.getName());
        for (Object param : params) {
            key.append("::").append(param == null ? "null" : param.toString());
        }
        return key.toString();
    };
}
Then reference it: @Cacheable(value = "products", keyGenerator = "customKeyGenerator"). Just make sure every parameter has a stable, deterministic toString() - otherwise you get cache misses on every call.
TTL and Serialization
Different caches usually need different TTLs. A user profile might live for an hour while a search result expires in 60 seconds. Configure that with a RedisCacheManager bean:
@Bean
public RedisCacheManager cacheManager(RedisConnectionFactory connectionFactory) {
    RedisCacheConfiguration defaultConfig = RedisCacheConfiguration.defaultCacheConfig()
            .entryTtl(Duration.ofMinutes(10))
            .serializeValuesWith(SerializationPair.fromSerializer(
                    new GenericJackson2JsonRedisSerializer()))
            .disableCachingNullValues();

    Map<String, RedisCacheConfiguration> perCache = new HashMap<>();
    perCache.put("products", defaultConfig.entryTtl(Duration.ofMinutes(30)));
    perCache.put("search", defaultConfig.entryTtl(Duration.ofSeconds(60)));

    return RedisCacheManager.builder(connectionFactory)
            .cacheDefaults(defaultConfig)
            .withInitialCacheConfigurations(perCache)
            .build();
}
The GenericJackson2JsonRedisSerializer stores values as JSON instead of Java's binary format. That makes your cache human-readable in redis-cli, survives version bumps of your domain classes better, and lets non-Java services read the same data. Just make sure your cached classes have a no-arg constructor and Jackson can serialize them.
Cache Warming and Best Practices
Cold caches hurt. The first user after a deploy waits for the slow DB query, and if you get a traffic burst at the same time you can crush your database (the "thundering herd"). Warm critical caches at startup with an ApplicationRunner:
@Component
public class CacheWarmer implements ApplicationRunner {
    private final ProductService productService;

    public CacheWarmer(ProductService productService) {
        this.productService = productService;
    }

    @Override
    public void run(ApplicationArguments args) {
        productService.findFeatured().forEach(p -> productService.findById(p.getId()));
    }
}
A few rules that have saved me grief:
- Cache reads, never writes. Never put
@Cacheableon a method that mutates state. - Pick TTLs that match how often the data changes. Static reference data can live for hours. User-specific data should expire fast.
- Always set a TTL. Unbounded caches eventually eat all your Redis memory and start evicting things you actually need.
- Monitor your hit ratio. Anything below 70% means your keys are too granular or your TTLs are too short.
- Skip
@Cacheableon internal method calls. Spring's cache proxies only fire on external calls - calling a cached method from another method in the same class bypasses the cache. - Version your cache names after breaking schema changes (
products-v2) so old serialized blobs do not blow up your deserializer.
For deeper Spring Boot patterns including security, persistence, and testing, the Building APIs with Spring Boot course covers the full stack.
FAQ
Do I need Redis if I only run one app instance? No - an in-memory cache like Caffeine is faster and simpler for single-instance apps. Reach for Redis when you scale horizontally, need cache survival across restarts, or want to share cached data between services.
Why is my @Cacheable annotation not working?
The most common cause is calling the method from inside the same class. Spring's proxy only intercepts external calls. Move the cached method to a separate bean, or inject the service into itself. Also check that @EnableCaching is on a configuration class that gets scanned.
Should I cache database writes?
No. Use @CachePut to update the cache after a successful write, or @CacheEvict to invalidate stale entries. Never use @Cacheable on a method that mutates state - it will skip the method entirely on cache hits.
What happens if Redis goes down?
By default, Spring Boot throws an exception and your method fails. Wrap your RedisCacheManager with a custom CacheErrorHandler that logs the error and falls through to the underlying method. Your app stays up, you just lose the cache speedup until Redis recovers.
How do I see what is in Redis?
Run docker exec -it redis-cache redis-cli then KEYS amigos::* to list keys and GET amigos::products::42 to inspect values. If you used GenericJackson2JsonRedisSerializer, the values are readable JSON.
Wrapping Up
Redis caching with Spring Boot is one of the highest-leverage upgrades you can make to a slow API. Three annotations, a Docker container, and a config file - and your p99 latency drops off a cliff.
Want the full Spring Boot picture with caching, security, testing, and deployment? The Spring Boot Master Class walks you through everything you need to ship production-grade backends.
Related Articles

9 Books That Made Me a Better Software Engineer (Not the Usual List)
Skip the generic recommendations. These 9 books changed how I write code, lead teams, and think about systems - from Clean Code to books most devs haven't heard of.

How to Become a Java Full Stack Developer in 2025 (Step-by-Step)
The exact skills, tools, and learning order to go from zero to hired as a Java full stack developer. Covers Spring Boot, React, databases, Docker, and what employers actually look for.
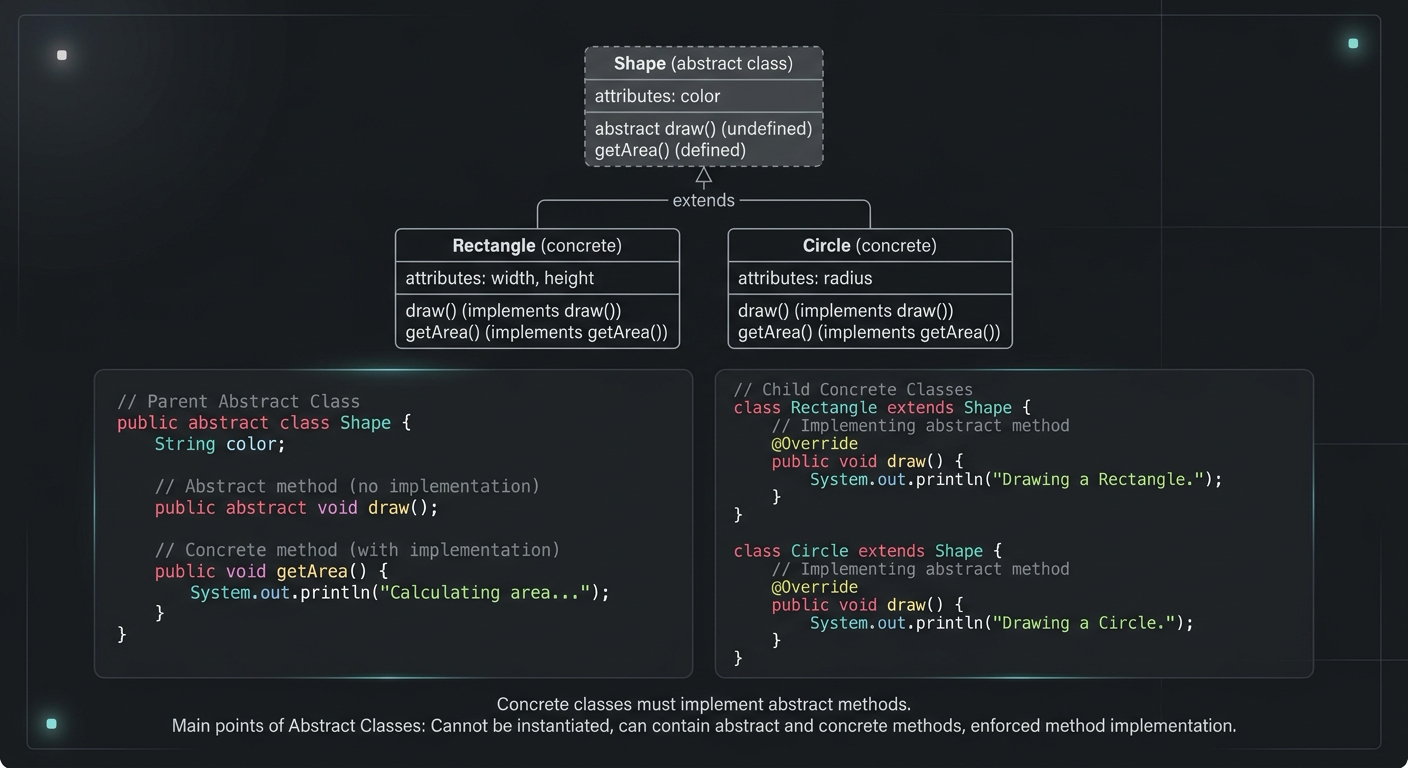
Abstract Class in Java (With Real-World Examples)
Abstract classes in Java are one of the most misunderstood OOP concepts. Here's a practical guide with real-world examples, code you can actually use, and the mistakes most devs make.
Your Career Transformation Starts Now
Join thousands of developers mastering in-demand skills with Amigoscode. Try it free today.